It’s about time I blogged again!
I have been asked recently by a number of people how I make my images “beautiful”… “A lot of thought and hours and hours of photoshop”, I reply. They laugh. Well, it’s true! Much as I love photographing people, photography is not a walk in the park. After the buzz and excitement of shooting, there’s the editing that lay ahead. The details may not be immediately obvious to the eye, but somehow people will see there is something different in an edited photo though they could not put their finger on it immediately. Here’s a glimpse into my work process that hopefully would answer some of these questions and give you insight into shooting and editing. Be prepared for a long one!
1. I usually take hundreds of photos on any shoot depending on the package. However, I try my hardest to do this not by simply snapping away but putting them on location or where I envision them to be and by composing each frame as quickly as I can whilst trying to catch natural looks and candid moments. Once I feel I’ve got the composition I like, I then take a few continuous shots especially in group photos. Where there are many in a group to be photographed, there is always the chance that some of them are either chatting, looking away, turning their bodies and backs etc, so continuous shots will increase my chances of getting a shot where many, if not all, are looking more natural and towards or at an angle to the camera.
2. The first edit: Nowadays, I usually sit with the client and show them all the photos on the camera’s LCD screen and together we delete the photos they do not like. I find that people are most critical of themselves in how they look. So we delete photos where they dislike their hair, the angles of their face etc. This then leaves me with photos I know they like – although they rarely say they like the way they look in a photo, instead they often say they “don’t mind” the way they look – I think this is very English and I take it as a Yes! The last thing I want to do is spend precious time editing a photo which they actually truly dislike, to near perfection.
3. The second edit. I go through my camera’s LCD again, decide for myself which to keep and which ones to delete forever. As this deletion is ‘forever’ I spend quite a lot of time doing this as I do not want to regret anything afterwards. I always shoot in RAW which takes up a huge amount of space so this stage of editing helps me save space on my computer.
4. The third edit. I load the photos that have made it through the second edit onto my computer. I open them in Adobe Bridge and go through each one again, this time ranking them, giving 5 stars for the ones I will definitely edit and 4 stars for the maybes. By this stage I will probably have up to 50% more photos than I need to give the clients.
5. The fourth edit. I look at the 5 star-rated photos and choose the very best of the best to edit. I open them up in batches – opening similar or same location photos with similar settings and exposure at the same time so when I tweak any initial adjustments in Camera Raw, I can do them in sets at once. I try to get the settings right in camera so as as to make very minimal adjustments at this stage. However, I believe that even the best photos SOOC (straight out of camera) can still do with some editing regardless of how little. In my experience, SOOC photos will still have areas that need editing, for example, correcting unsightly colour casts – like taking the blue out of white clothing and snow or the red or orange tinge of the skin.
6. The fifth edit. Here the nitty gritty are dealt with. How am I going to edit this? What vision do I have for this photo to look when finished. What tone and feel do I want this photo to look – vintage, modern, colourful and vivid, black and white, sepia….? Will I use an action for this photo? If so, which one? Colour correction: I correct all the skin tones so they look more natural rather than red. Are the white of the eyes white? Are the teeth white or reasonably white? Does snow look white. Do shadows need lightening or some areas need darkening? Do I need to add a vignette? Does the skin need smoothening? Are there blemishes that need erasing? How shall I juice-up the eyes? With children, it’s very common to photograph them with their mouths covered in crumbs, runny noses, snot and all, so all these need erasing too.
7. After this stage, I begin to see the light at the end of the tunnel. I do the last bits of editing adjusting levels, sharpening and saving. But it’s not the end quite yet. There’s proofing to come…
8. Each individual edited image will then be resized and re-sharpened for web. They will be uploaded onto the internet (usually Facebook) for viewing / proofing, and when I get the time, they will be resized again but this time for my blog. Sometimes, I add digital papers, frames and textures to make proofing more interesting and pretty.
9. By this time, I’m a relieved happy girl….just the last bits of admin to do now…like creating a DVD slideshow perhaps or a photobook depending on what the client requires, packaging and labeling….this doesn’t take as long….just an entire evening or two….
To say that this job is time-consuming is an understatement. But I love it. Perhaps once day, I will learn to refine my work process so my rates reflect more fairly the hours I spend on completing a shoot. When that day comes, I’d be one very happy girl.
I am constantly learning and educating myself in a variety of ways: by practising a lot on my kids (most of the time unwilling models), reading articles, looking at other people’s photos and following photographers that I really like and their work on the internet. The former helps me become a better photographer when shooting on the fly which is what I usually do; the latter trains my eye to make better judgments especially in editing.
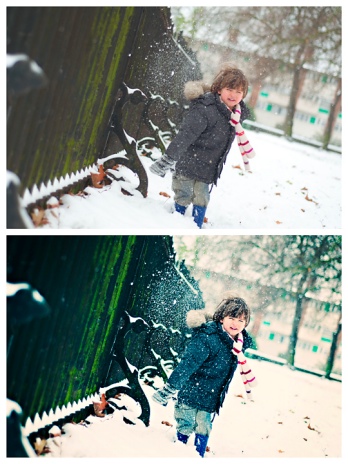
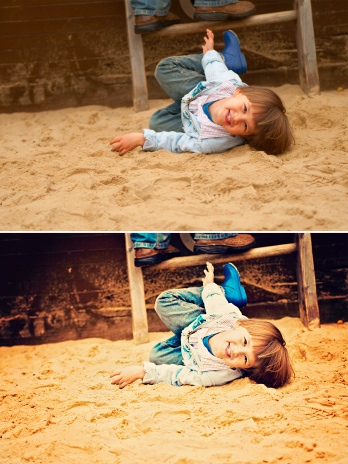
In view of this blog post, checkout my before-and-afters on my facebook page Lily Sawyer Photography. At the end of the day, it’s down to individual taste and style.

